How to resize or watermark images
Are your images too large and taking too long to upload? If you are experiencing this, we strongly recommend that you download and install ‘Quick Web Photo Resizer’. This is an easy to use program that will enable you to easily reduce the size of multiple images. You can download the application here: http://intermaticsng.com/downloads/qwpr.zip .
This application also enables you to easily add a watermark or logo to you images. This is very useful for merchants that are concerned about protecting their images.
The Main Idea
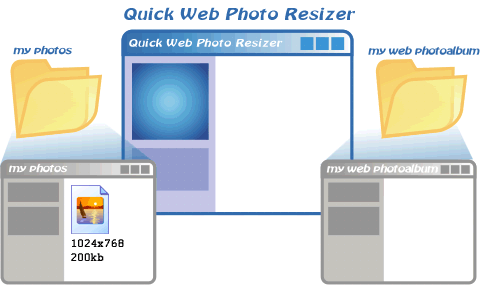
To process a photo with Quick Web Photo Resizer, just drag and drop it from any folder of your computer (or from the desktop) into the blue drop target of Quick Web Photo Resizer. It will be immediately processed with the settings that can be selected using the special control below the blue drop target. Then just drag the finished image file from the right part of Quick Web Photo Resizer wherever you like (to a folder on your computer, into a new email message, upload to your web site, copy to a CD etc).
It’s quick like never before! Just drag into the window, and then out of the window:

Processing Settings
When you drag an image file to the blue drop target, it is immediately processes with the current settings scheme. If you need to change the scheme, its needed to do it before dragging and dropping the image file.
Customizing the Settings Schemes
To customize the settings schemes, click the Edit Settings ![]() link.
link.
You can delete a scheme using the Delete Scheme link or create a new one by saving an existing scheme under a new name using the Save Scheme As link.
Available Settings Scheme Options
For each settings scheme the following options are available:
- Image Size: Set the image size the pictures will be resized to. Quick Web Proto Resizer uses an extra high quality resizing algorithm.
- If the aspect ratio doesn’t match: Here you can set how Quick Web Photo Resizer should behave if the aspect ratio of the image that is to be processed does not match the aspect ratio of the Image Size setting above.
- Make smaller: If the image is wider than the Image Size setting, its new height will be smaller than the Image Size height. If the image is narrower, its new width will be smaller.
- Crop the image: The new image size will exactly match the Image Size setting in any case, but if the image that is to be processed is wider or narrower then the Image Size setting, some of the edges will be cut off.
- Compression: JPEG images can be compressed with different compression ratios. The more compressed the image is, the more compression artifacts you see, and the less compressed the image is, the more time will it take for the viewers to load from the web.
- By quality: Set the fixed value of the compression strength. The bigger is the value, the better is the quality and the size it is. With this setting, images that have more small details will be bigger in size than those that have not (for example, picture of trees will be bigger than a picture of sky). If you don’t know what to set, the recommended default value it 80.
- By size: Here you can set a fixed size in kilobytes that the size of the output JPEG files will be less or equal to. Less detailed pictures will be compressed with better quality, and all the pictures processed with the same By size setting will take exactly the same time for a viewer to load form the web. For example, the recommended size for a 640 by 480 pixels image is about 60 – 70 KB for fine quality, and about 90 – 100 KB for a quality that in most cases will look like perfect.
- If the picture looks bad, it means that you’ve set a too low value of size/quality.
- Modify file name: here you can set a prefix or suffix to be added to the names of the processed files. The asterisk * is replaced with the input file name. The output file names are lowercase, because all-lowercase file names are strongly recommended for all files that are going to be to be distributed by the internet (this is because most internet servers are case-sensitive).
- Add a logo: You can have a logo or a watermark be inserted into each picture processed with this scheme. To choose a logo image file, click the
 icon. We recommend to use transparent GIF or PNG images for the logos, although you can use square JPEG or BMP images (please make sure that the logo is small enough to be just a logo on the resized image, not cover all the picture). PNG images with an alpha channel are also supported, so advanced users can use a third party image editing tool like Photoshop to create a semi-transparent, shadowed or antialiased logos).
- Base Position: Choose where to place the logo.
- Offset X & Y: Make an offset from the Base Position if needed.
Tip: You can drag a group of pictures onto the drop target at once, and all of them will be processed. Thus you can resize, compress and (if needed) add a logo to the whole folder of images without even clicking anything (by just dragging and dropping).
