Marketing your products on Facebook & Instagram – Part 1
Facebook is an effective platform for promoting your products and boosting online sales! It is especially suited for B2C marketing which is the category most online retailers fall into. Facebook is also the medium through which you create Instagram ads. The same ad you create for Facebook will automatically display on Instagram unless you disable it.
We are considering paid Facebook advertising in this series. You can ofcourse promote your products for free by posting them on your Facebook page and on related Facebook groups. However, for a serious online retailer, your primary objective should be to drive relevant traffic to your own website and try to make sure a good percentage of that traffic converts to paying customers ( the conversion rate).
Facebook advertising has the following advantages:
1. It can be quite cost effective especially when compared with other popular online advertising platforms e.g. Google Adwords
2. It is relatively easy to setup. Competing platforms such as Google Adwords typically require you to hire experts in order to effectively setup and monitor your campaigns. Facebook ads on the other hand are alot more straightforward to setup.
3. Flexible targeting options. Facebook gives you quite a few options for targeting. You can target potential customers based on demographics (e.g. Age range, gender etc ), location, interests, affiliations and even based on contact information ( I.e. email addresses and telephone numbers) . When used wisely, you can get a very good return on your marketing investments.
Lets go through the various steps you should go through in order to setup an effective Facebook campaign.
Prepare your ad images
Facebook supports various ad formats. Examples include video ads, Image ads, boosted posts among others. We are going to concern ourselves only with image ads.
Facebook image ads comprise of text and images. These ads can appear on the facebook newsfeed, instagram and on the sidebar.
The image(s) you use plays a very important role in the success of your campaign.
It is recommended that you get a professional graphics artist to design them for you (StoreMantis provides affordable design service for this purpose). However, you can also use the stock images provided by Facebook. Images are supposed to have a dimension of 1200px X 900px. Also ensure that the images do not have alot of text. If text occupies more than 20% of your image’s area, Facebook will not approve your ad.
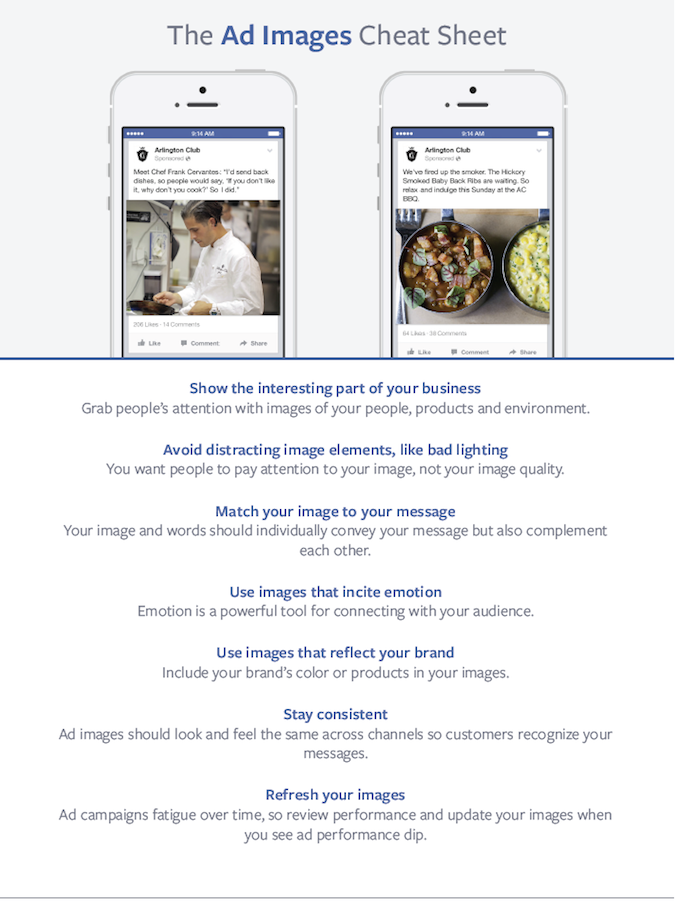
Here is the cheat sheet for Facebook ad images:
Prepare your ad copy
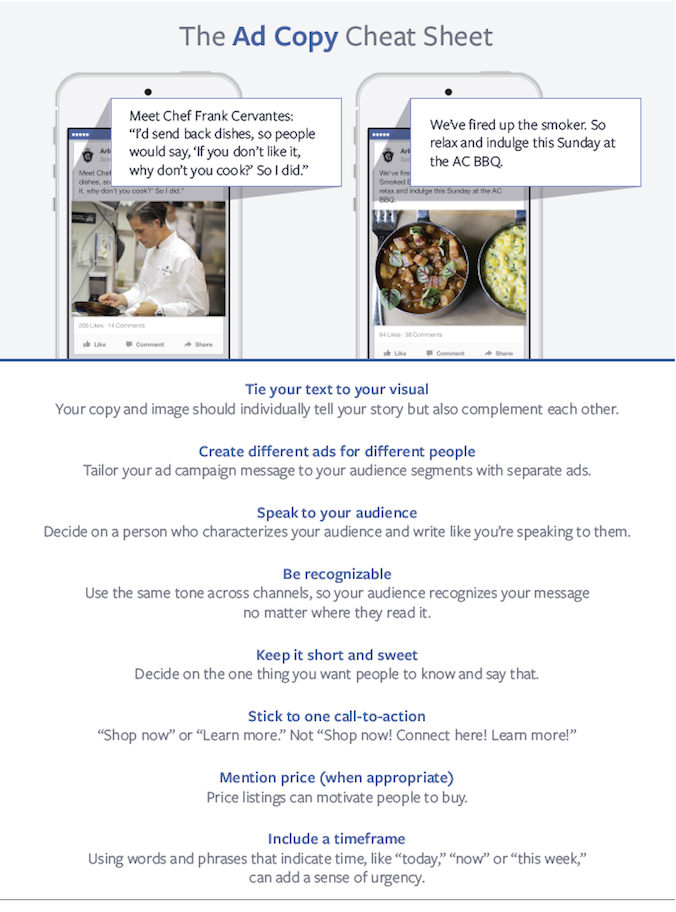
Each Facebook ad must have some associated text. Your text should drescribe what people should expect to see if they click on your ads. Find below the Facebook ad copy cheatsheet
Prepare your landing page
Your landing page is where visitors will arrive on your website immediately they click your advert. Your landing page can be your homepage, a category page, a product page etc. It is important that your landing page carries the same message that your ad conveys. If your visitors can not easily access what they clicked your advert for, they are likely to quickly exit your site. Hence it it usually recommended that you do not use your homepage as a landing page. Instead, use a product category or product page that contains only products that were related to your ad.
To learn more about landing pages, I recommend this article: http://landerapp.com/blog/how-to-use-landing-pages-to-set-up-a-high-converting-online-store/
Setup the Facebook pixel
The Facebook pixel is a code snippet you will receive from Facebook to install on your site.
The Facebook pixel can be used for three main functions:
1. Building Custom Audiences from your website for remarketing.
2. Optimizing ads for conversions.
3. Tracking conversions and attributing them back to your ads.
Benefits of using the pixel
With the Facebook pixel, you’ll also be able to:
See rich insights: In Ads Manager you’ll see a dashboard which gives you information on the traffic across your website.
Share your pixel: Useful when working with an agency or Facebook Marketing Partner. Instead of implementing a second pixel for your agency, you can
share your existing pixel with them through Business Manager.
Instructions for setting up the pixel can be found here: Basically it entails copying the code from Facebook and then, in your StoreMantis dashboard, navigate to ‘Store Design’-‘Advanced’-‘Install Scripts’. Then paste the code in the ‘Header Scripts’ section. Save your changes and you are done. If you have difficulty doing this, simply create a support ticket for assistance.
Determine your targeting
This is where alot of advertisers make costly mistakes. Targeting determines who will get to see your ad. If you go wrong with targeting, you can expect to see quite a low ROI. It is important to take the following tips into consideration:
1. Do your research: You should ask yourself who your ideal customer is. This question should be easy to answer if you already have a large customer base. Identify the attributes of your ideal customers and use those in your targeting.
2. Use custom audiences and lookalike audiences: Facebook enables you to use your existing customer or leads database to target users. All you need are the email addresses or telephone numbers of your customers/leads. Facebook will then show your ad to only these people. The principle behind this is that it is alot easier to sell to existing customers than to sell to new ones.
You can also create a lookalike audience to your existing list. When you select this option, Facebook will look for users that share similar traits to those on your list. These users will also get to see your ad.
Find below a good cheatsheet for Facebook targeting
(Provided by Qwaya)
Setup Google analytics
It is important that you setup a good analytics program on your site. This will enable you measure your ads effectiveness in terms of traffic. Google analytics is one of the best in this regard and its also free. For instructions on how to set up Google analytics, kindly read this post: http://blog.storemantis.com/how-to-install-the-google-analytics-tracking-code/
This brings us to the end of Part one of this series. Watch out for part 2 where we will go through the steps involved in setting up a campaign.


